Saturday, April 10, 2010

Fifth Avenue Floral

Stamp Set:  Fifth Avenue Floral
Card Stock:  Nouveau Chic DSP, Whisper White, Basic Gray, & Sage Shadow
Ink:  Basic Gray and Black Staz On Ink, Sage Shadow and Apricot Appeal Watercolor Crayons
Accessories:  Basic Gray Taffeta Ribbon, Aqua Painters

Dream Gardens

Stamp Set:  Dream Gardens
Card Stock:  Whisper White, Real Red, Basic Black
Ink:  Real Red and Basic Black
Accessories:  Post It Notes, Sponge Daubers, Big Shot, and Perfect Detals Texturz Plate

To create the frames in the corners, apply post it notes around all the edges of the stamped image.  Don't pre- trim your image.  Apply ink to the sponge daubers, then carefully apply in each of the corners.  Peel off the post it notes, then trim your image to the desired size.

French Flair

Stamp Sets:  French Flair and Teeny Tiny Wishes
Card Stock:  Bermuda  Bay and Very Vanilla
Ink:  Bermuda Bay and Very Vanilla Craft Ink
Accessories:  Scalloped Heart Embosslit, Big Shot, Very Vanilla Embossing Powder, Heat Tool, and Modern Label Punch

Thursday, March 11, 2010

Well Scripted


Stamp Set: Well Scripted
Card Stock: Basic Black and Brushed Silver
Accessories: Basic Black 5/8 inch Satin Ribbon, Perfect Polka Dot Embossing Folder, Big Shot, 1-3/8 inch Square Punch, Scallop Trim Border Punch, and Scallop Trim Corner Punch

To create the scallop border square, begin with a 2 x 2 inch square. Punch one corner using the Scallop Trim Corner Punch, then punch the opposite corner, punch the remaining 2 corners. This ONLY works with the Scallop Trim Corner Punch.

Manhattan Flower


Stamp Set: Well Scripted
Card Stock: Whisper White and Melon Mambo
Ink: Melon Mambo
Accessories: Big Shot, Manhattan Flower Embossing Folder, Color Spritzer Tool, and Pink Passion Stampin' Write Marker

Messages for Mom

Stamp Set: Messages for Mom
Card Stock: Almost Amethyst, Certainly Celery, and Water Color Paper
Ink: Almost Amethyst and Certainly Celery
Accessories: Aqua Painters, Masterpiece Ribbon Originals, Soft Subtles Brads, Color Spritzer Tool, and Almost Amethyst Stampin' Write Marker

6 x 6 Scrapbook Page


Stamp Sets: Very Vintage Jumbo Wheel and Ever After Stamp Set
Card Stock: Whisper White, Lovely Lilac, and So Saffron
Ink: Lovely Lilac and So Saffron Jumbo Ink Cartridge
Accessories: Elegant Eggplant Grosgrain Ribbon, Big Shot, Scallop Square Die, Perfect Details Texturz Plate, Scallop Square and 1-1/4 inch Square Punches

That's my niece in the picture =)

Vintage Vogue


Stamp Set: Vintage Vogue
Card Stock: Whisper White and Crushed Curry
Ink: Crushed Curry
Accessories: Finial Press Embossing Folder, Big Shot, and Crushed Curry Polka Dot Grosgrain Ribbon

Stamp sentiment on panel before running it through the Big Shot in the Finial Press Embossing Folder

Medallion


Stamp Sets: Medallion and Whimsical Words (Sale-A-Bration '10)
Card Sock: Rich Razzleberry and Razzleberry Lemonade DSP
Ink: Basic Black, Versamark and Rich Razzleberry
Accessories: Anti Static Bag, Brayer, Clear Embossing Powder, Curly Label Punch, Dimensionals, and Heat Tool

Rub anti static bag on Designer Paper. Stamp the Medallion in Versamark, cover with Clear Embossing Powder, then heat with heat tool. After the image has cooled, run the brayer with black ink repeatedly over the image until the background paper is covered. With a tissue, wipe embossed image clean of black ink.

Friday, December 18, 2009

Vintage Vogue and Very Vintage


Stamp Set: Very Vintage Jumbo Wheel and Vintage Vogue Stamp Set (Occasions Mini Catalog)
Paper: Very Vanilla, Cameo Coral, and Old Olive
Ink: Old Olive and Cameo Coral
Accessories: Stamp A Ma Jig

Whimsical Words


Stamp Set: Whimsical Words (Sale A Bration Set)
Paper: Pretty in Pink, Whisper White, and Certainly Celery
Ink: Stampin' Pastels, Pretty in Pink & Certainly Celery Stampin' Write Markers
Accessories: Big Shot, Elegant Bouquet Textured Embossing Folder, Scallop Circle Punch, 1 3/8 inch Punch, and Q-Tips

I used the Stampin' Write Markers to ink the sentiment in the 2 different colors. I used a Q-Tip to apply the chalk to the flowers and stems.

Whimsical Words


Stamp Set: Whimsical Words (Sale A Bration Set)
Paper: Very Vanilla and Rose Red
Ink: Rose Red
Accessories: Big Shot, Movers and Shakers Curly Label Bigz Die, Punch Windows, Rose Red Grosgrain Ribbon, Full Heart Punch, & Pinking Hearts Border Punch (Occasions Mini Catalog)

Monday, October 26, 2009

Serene Snowflakes and Christmas Punch


Stamp Sets: Serene Snowflakes (Holiday Mini Catalog) & Christmas Punch (Hostess Set)
Card Stock: Night of Navy and Shimmery White
Ink: Night of Navy
Accessories: Sponge Daubers, Frost White Shimmer Paint (Holiday Mini Catalog), Wide Oval Punch, and Stampin' Dimensionals

Pour a small amount of Shimmer Paint on a non-porous surface (I used an old CD). Apply the Shimmer Paint to the stamp using a Sponge Dauber. Stamp image on dark card stock and allow to dry. I stamped the sentiment of Shimmery White card stock, then used the Wide Oval punch to punch it out. I then attached it to the card front using Stampin' Dimensionals.

Charming


Stamp Set: Charming (Holiday Mini Catalog)
Card Stock: Always Artichoke, Creamy Caramel, & Rose Red
Ink: Always Artichoke, Whisper White, Creamy Caramel, & Close to Cocoa Ink Pads, Cameo Coral, Real Red, & Always Artichoke Stampin' Write Markers
Accessories: Aquapainters & Sponge Daubers

Stamp image on Creamy Caramel card stock. Apply highlights using the Aquapainter and Whisper White Craft Ink. I highlighted the centers of all the flowers. Allow image to dry. Using the sponge daubers, apply the Creamy Caramel ink close to the stamped highlighted image. Use another sponge dauber to apply the Close to Cocoa ink toward the outer edges of the card stock. I applied Creamy Caramel ink to the edges of the Creamy Caramel card stock attached to the card base.


Plenty of Petals and Holiday Best


Stamp Sets: Holiday Best (Level 1 Hostess Set)
Card Stock: Whisper White and Real Red
Ink: Glorious Green Ink Pad and Real Red Stampin' Write Marker
Accessories: Big Shot, Plenty of Petals Textured Embossing Folder, and Blender Pens

After I applied ink to the stamp, I used the Blender Pens to wipe the color off the cardinal, then used the Real Red Stampin' Write Marker to color the bird red. Wipe the tip of the Blender pen on a piece of scratch paper until it comes clean.

Tuesday, September 22, 2009

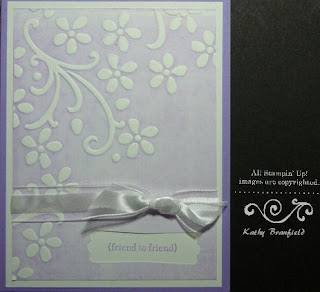
Elegant Bouquet


Stamp Set: Teeny Tiny Wishes
Ink: Almost Amethyst
Card Stock: Whisper White and Almost Amethyst
Accessories: Big Shot, Elegant Bouquet Textured Impressions Embossing Folder, Brayer, Stamp A Ma Jig, Modern Label Punch, and Whisper White Organza Ribbon

Apply Almost Amethyst ink to the brayer. Open the Elegant Bouquet Embossing Folder. Run the inked brayer over the inside of the embossing folder-the side with the black arrow on it. Carefully place the card stock in the folder and close. Run through the Big Shot. Use the Modern Label Punch on the card stock. Layer on top of the Whisper White card stock. Use the stamp a ma jig to line up the saying from the Teeny Tiny Wishes Stamp Set, and then stamp the sentiment in Almost Amethyst ink. Tie the White Organza ribbon with a knot, then assemble the rest of the card.

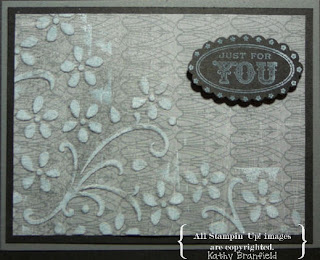
Oval All and Elegant Bouquet


Stamp Set: Oval All
Card Stock: Basic Black, Basic Grey, and Nouveau Chic DSP
Ink: Whisper White Craft Ink
Accessories: Big Shot, Elegant Bouquet Textured Impressions Embossing Folder, Brayer, and Scallop Oval Punch

Run the Nouveau Chic DSP through the Big Shot in the Elegant Bouquet Embossing folder right side up. Run the Brayer over the Whisper White Craft Ink Pad until it is completely covered. Run the Brayer lightly over the raised image. Cover the unraised portion of the card with scrap paper or card stock to avoid transferring the ink to the flat portion of the card. Do not handle the DSP until the white ink is completely dry. Use your heat tool to speed up the drying time.

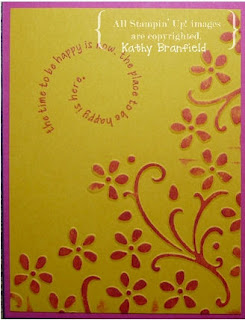
Garden Whimsy and Elegant Bouquet


Stamp Set: Garden Whimsy (saying in the upper left of card)
Card Stock: Melon Mambo and Crushed Curry
Ink: Melon Mambo
Accessories: Big Shot, Elegant Bouquet Textured Impressions Embossing Folder, and Brayer

Run the card stock through the Big Shot in the Elegant Bouquet Embossing folder. Ink the brayer with Melon Mambo ink, then lightly run across the raised image. If you have trouble getting ink on the flat portion of the card (the upper left of this card with no raised image), place a piece of scrap paper or card stock over the portion of the card you do NOT want ink on. Finish the card as desired.

Thursday, September 10, 2009

My Digital Studio Card


I used the My Digital Studio program to create this card. I used the Razzle Dazzle Stamp Set, Eyelet Border Stamp, and the Curly Label Punch. A quick way to design a card without wasting card stock, etc. Plan your project, then duplicate it with the stamps!

My Digital Studio

Here's a list of what contents are included in the My Digital Studio Software. There are about 2000 images included.
Future downloads will be available for purchase.


My Digital Studio Contents.docx
Related Posts Plugin for WordPress, Blogger...